Minimal Viable Developer: acing your first month in software
August 16, 2021
It’s easy to be overwhelmed by the novelty and demands of your first software role, whether that’s an internship or a full-time position.
This is a guide to the tools, skills, and rituals you’ll encounter in a real software shop. It assumes that you already know the mechanics of coding, and focuses on the key differences between working on school projects and contributing to a business-critical codebase.
It’s applicable to data science, backend, or frontend roles; it’s about everything that’s not writing your favourite flavour of code.
This guide is going to be more useful for people joining startups than established companies. FAANG 17 companies will put you through 4+ weeks of formal onboarding. In a startup you’re more likely to be handed a laptop and a t-shirt, and asked to join your colleagues in desperately trying to steer a sinking ship towards profitability. Let’s get you from deadweight to oarsman in the briefest time possible.
Table of Contents
Toggle
- The Software Lifecycle
- Wrapping up the cycle
- Further reading
The Software Lifecycle
When you join your first company, you’ll be confronted with a dizzying amount of information. You’re going to have to make some hard choices about where you should focus your energy.
Rather than setting aside a week to read the entire codebase, learn about users, or sitting down with everybody in the organization to understand their role, I suggest you focus on understanding the code lifecycle: the process whereby code gets written and incorporated into the product.

The Code Lifecycle. Move through this loop as quickly as possible to maximize your learning on the job. The ship corresponds to deployment (also known as shipping). Source: author
Software building is an iterative process. We decide what needs to be done, write code to do it, have it reviewed by our peers, and deploy it, and then do it all again. The faster you are able to iterate, the faster you will learn and the more you will get done 18.
Your goal should be to maximize the number of these cycles that you go through in your first few months of the job. It’s good for you to optimize for this, because it maximizes your learning, and it’s good for the organization, because they get lots of chances to nudge you towards valuable outcomes.
Here are the steps we’re going to discuss, and you should figure out fast:
0. Setup: How do I get the code on my computer and run it? Hopefully you only need to do this once, so it’s not part of the core loop.
1. Tasks: Where are tasks organized, and how are they allocated?
2. Code: How do I write and test code?
3. Git: How do I push code to version control?
4. Review: How do people review my work?
5. Deploy: And how does it finally get deployed? 19
Why should you focus on executing this lifecycle?
Fresh from university with a head full of algorithms, you might think that your time is best spent sitting with the cleverest programmers you can find, picking up tips on how to efficiently implement travelling salesmen algorithms.
Please don’t do this. Instead, get really fast at navigating the systems you need to understand to go through this cycle quickly.
If you’d like to shadow somebody, pick the person on the team who seems to get through the most tasks, even if they’re not the most sexy or interesting ones. They’ve figured out how to go through this cycle quickly.
Why is it so important to get quick at these steps? Those 5 steps are a fixed cost to any change you want to make to the codebase. Their cost doesn’t scale with the complexity of the code you’re writing20 . This means that they take roughly the same amount of time whether you’re fixing a typo or rewriting an entire API.

It takes roughly the same time to go through the code lifecycle for big or small changes to the codebase. If it takes a long time for you to go through these steps, small tasks are prohibitively slow. Source: author
If you can reduce the cost of executing them to a tiny amount, you’re able to pick up small pieces of work and execute them efficiently. Small pieces of work have a much higher chance of being deployed quickly, and you will complete a full cycle faster. You will get more feedback, earlier, and you’ll gather momentum faster than a cheese rolling down a hill.

You want to pick up lots of small tasks and execute them quickly. If you struggle with the basics, you’ll be tempted to pick up more complex tasks to compensate for the long cycle time, and finish the week without anything deployed – a bad week. Source: author
The rest of this post is a step by step guide to these steps, and the tools you’ll need to work with them, and how to execute them efficiently.
What if I get stuck?
The bad news: you won’t have been taught most of this stuff at school or university.
The good news: nobody you’re working with learned it at university either!
Everybody who works in software figures things out via roughly the same three tactics:
- Google stuff (usually resulting in Stack Overflow)
- Read a book if they’re old school, or a blogpost if they have a short attention span 21
- Ask somebody who might know
Please don’t feel anxious or embarrassed about leaning heavily on #3.
The people around you have spent hours feeling confused and frustrated by software problems, and they would love to share the benefits of those experiences with you.
Here’s some advice from my friend Jonny, who progressed from intern to a central pillar of one of the product teams at Element AI in a matter of months:
“In my experience that [getting stuck] is the biggest slow-down for beginners. They feel like they need to prove themselves, and therefore don’t want to admit mistakes or gaps in knowledge – which ironically prevents them from iterating and learning fast. My advice is to timebox how long you go before asking for help. Also, get familiar with the internal documentation tool (eg Confluence) and give that a search before asking. Asking for help all the time is 100% the only reason that I am the developer I am today. This could be your assigned “buddy”, a member of your team, whoever modified the code last (check via git blame) or literally anyone! Just don’t let yourself get blocked and stay there.”
0. How do I get the code working on my computer?
Most companies use version control to keep track of their code. This allows multiple people to work on the same project without overwriting each others work, whilst keeping a bulletproof log of previous versions so that it’s easy to recover old work if you need to. Multiple copies of the code are stored on the internet, in a structure called a repository.

A version control program such as Github (who have this weird octocat character as a mascot, pictured in the centre) allows multiple developers to develop independently, periodically updating the shared copy of the code that lives on the internet. Source: author.
In the 21st century this version control usually means using a technology called git. Developers copy an online git repository to their local machine – this is called cloning – and then make changes, before copying them back to the server – pushing their work.
Although the underlying technology – git – is open source and standard, there are a bunch of different websites who will host your git repositories for you. Github, Gitlab, and Bitbucket are the main three.
I’m going to assume you’re using Github for brevity, but everything below applies equally to the other providers.
1. Get access to the online code repository
Create a Github account if you don’t already have one. Ask your supervisor to give you access to the project.
Alright, that was an easy one. We’re off to a fast start.
2. Install an SSH key
To save you having to authenticate every time you want to push or pull code, you should set up an SSH key for your version control system. SSH keys allow your computer to identify you to the server, and confirm that you should be granted access.
Github has a good guide to generating and uploading your key.
Each SSH key pair consists of a public key and a private key. The public key is the one that you upload to Github, and it looks something like.
$ cat ~/.ssh/id_rsa.pub
ssh-rsa AAAAB3NzaC1yc2EAAAABIwAAAQEAklOUpkDHrfHY17SbrmTIpNLTGK9Tjom/BWDSU
GPl+nafzlHDTYW7hdI4yZ5ew18JH4JW9jbhUFrviQzM7xlELEVf4h9lFX5QVkbPppSwg0cda3
Pbv7kOdJ/MTyBlWXFCR+HAo3FXRitBqxiX1nKhXpHAZsMciLq8V6RjsNAQwdsdMFvSlVK/7XA
t3FaoJoAsncM1Q9x5+3V0Ww68/eIFmb1zuUFljQJKprrX88XypNDvjYNby6vw/Pb0rwert/En
mZ+AW4OZPnTPI89ZPmVMLuayrD2cE86Z/il8b+gw3r3+1nKatmIkjn2so1d01QraTlMqVSsbx
NrRFi9wrf+M7Q== schacon@mylaptop.local
The private key stays, encrypted, on your computer. Github will send data encoded with the public key that can only be decrypted using the private key. 22. Here’s an overview of SSH for more detail.
I would advise against setting a passphrase on your SSH key. Your computer is already password protected (right?) and I don’t think it’s helpful to have this additional barrier to iteration. 23
3. Use a terminal to clone the repo
Now you need to copy the repositories – or repos – that you’ll be working on to your local machine. This is called cloning, because you’re creating an exact copy, like Dolly the sheep.
To do so, you’ll need some kind of terminal, which will use a language like bash, zsh, or fish to handle basic system-level operations.
iTerm, the most popular Mac OSX terminal. Source: iTerm
Most people I know on a Mac use iTerm instead of the built in Terminal, which gives you various nice features like split panels.
In my experience universities aren’t very good at teaching people how to use the terminal, and lack of basic proficiency here will really slow you down. I suggest you spend a few hours practising how to:
- Navigate directories (
cd,ls,pwd) - Make and delete files and directories (
touch,rm,mkdir) - Display the contents of files and search within them (
cat, grep) - Reverse search to find commands you’ve previously used (
ctrl+r)
Unix (the language that most shells are based on) is an incredibly powerful and flexible computing environment, of which most users (like me) barely scratch the surface. In fact, most developers will be more impressed if you are an awk ninja than if you’ve completed an online Tensorflow certificate: consider investing some time here rather than flashier options. This book is good, if you want to go deep.
Ok, let’s assume you’re running something like
git clone git@github.com/mycompany/myrepo.git
And you’ve seen a message something like
Cloning into 'my-first-repo'...
remote: Enumerating objects: 58, done.
remote: Counting objects: 100% (58/58), done.
remote: Compressing objects: 100% (43/43), done.
remote: Total 58 (delta 8), reused 54 (delta 8), pack-reused 0
Receiving objects: 100% (58/58), 48.83 KiB | 200.00 KiB/s, done.
Resolving deltas: 100% (8/8), done.
And now you have a repo ready to go.
4. Get it running
The specific instructions for getting your project running should be described within the project, traditionally in a file called README.md. If they aren’t, ask somebody to walk you through getting the code running and offer to write the README.md for the repo – this is a very high value task!
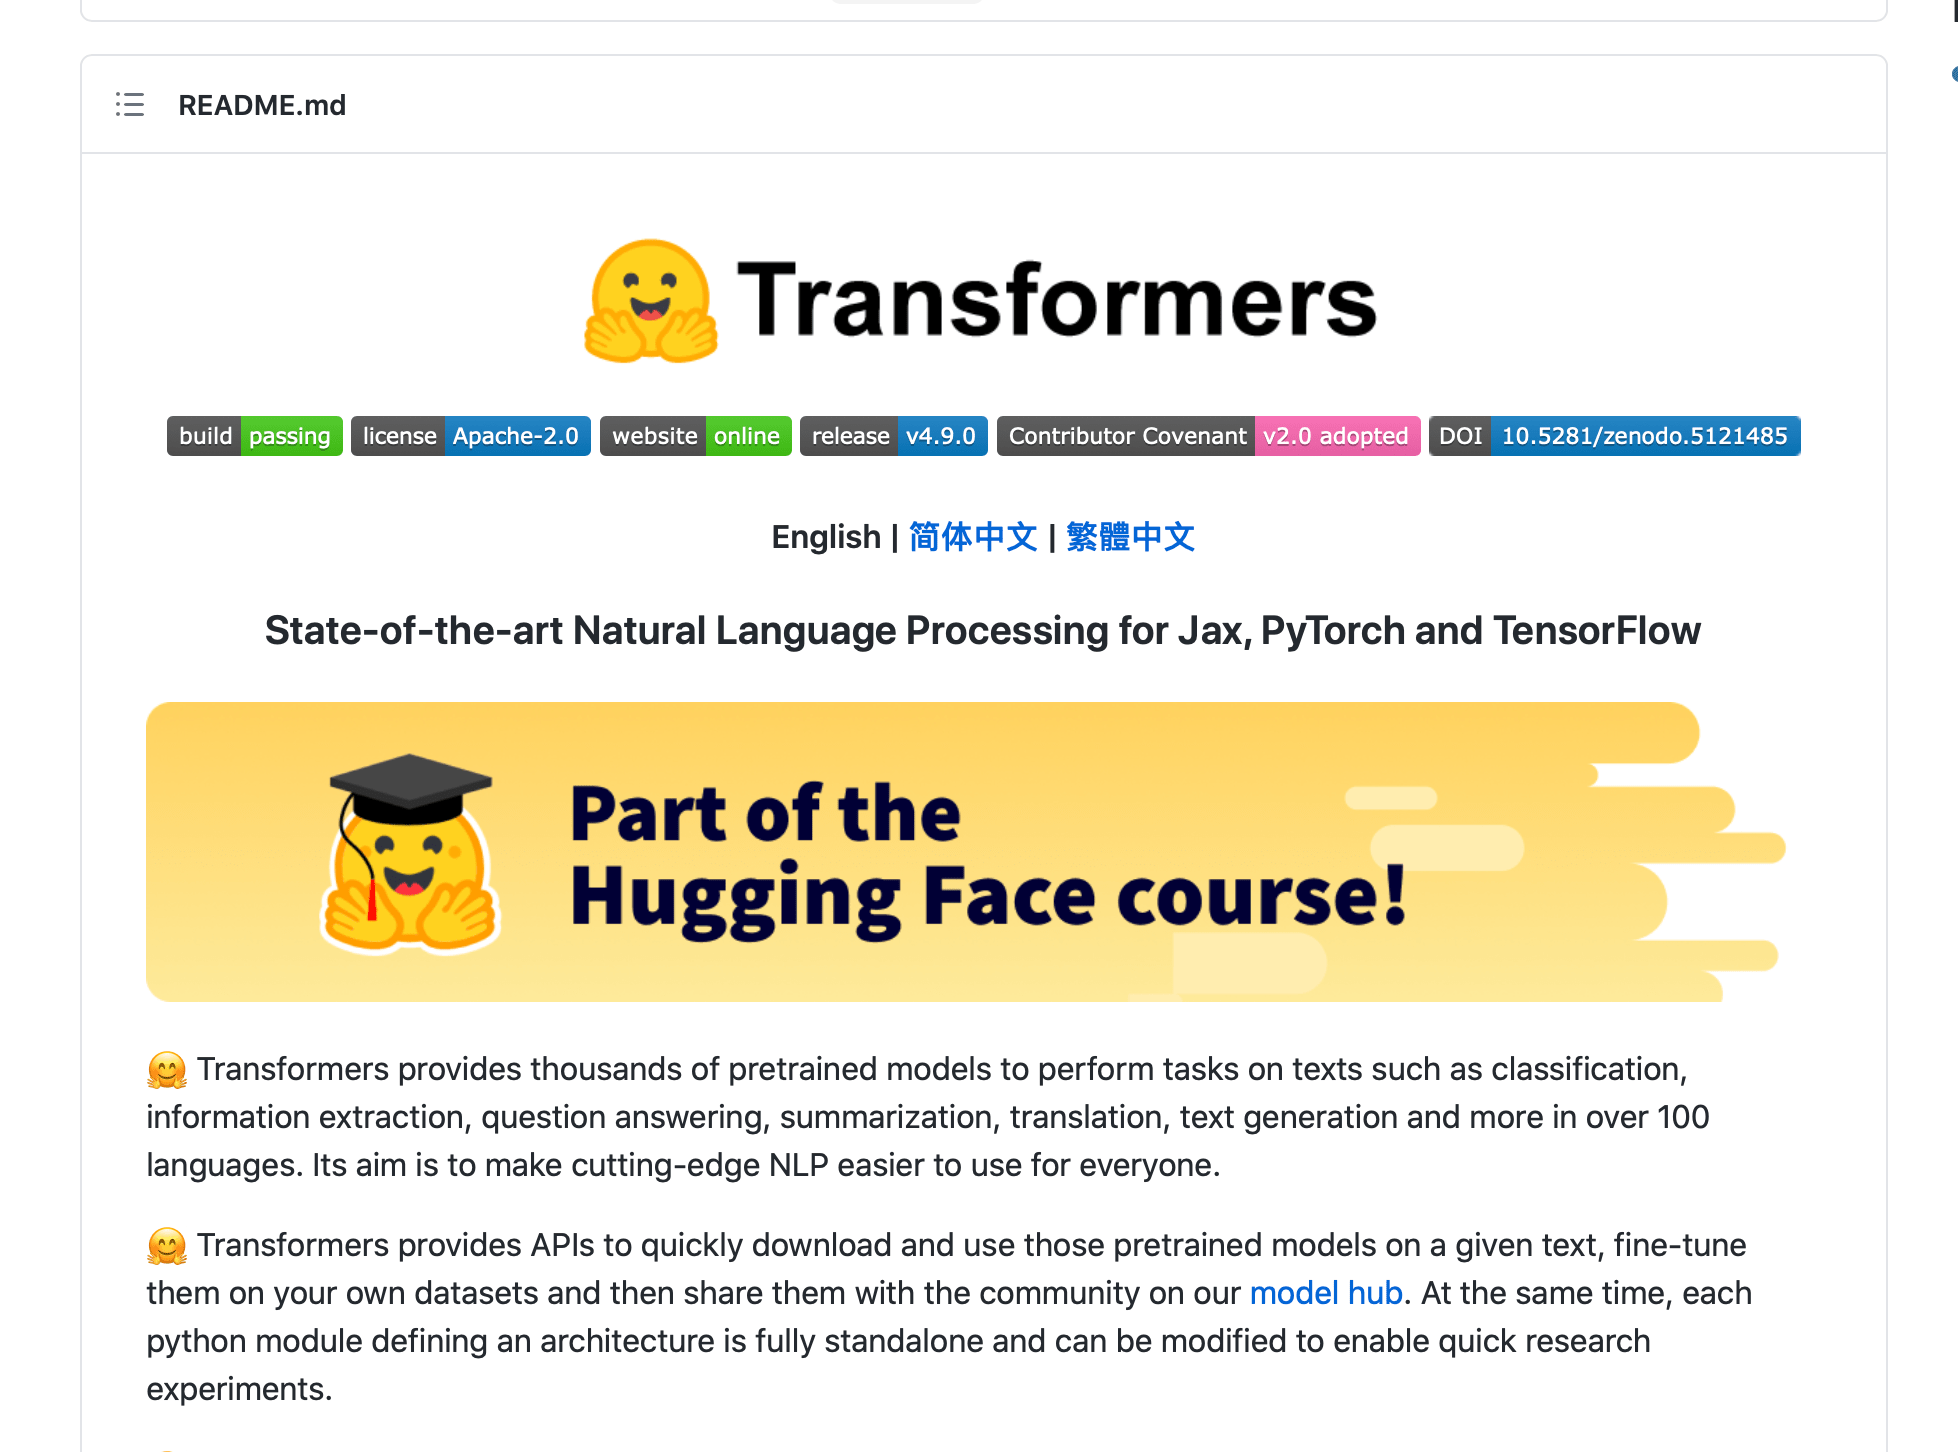
An example README, from https://github.com/huggingface/transformers. If you include a file called README.md at the root of your repository, it’s typically rendered by your version control system when people navigate to the code online, as a user guide. All those brightly coloured badges relate to various build and test statuses for the repo. Source: HuggingFace
Getting a new repo set up for the first time can be a thorny challenge, because many projects have dependencies on external systems, such as Amazon Web Services (AWS) or Google Cloud Platform (GCP).
You’re probably also going to need logins for them, and perhaps to install a command line interface (CLI) to work with them more smoothly. Ask for all the logins you might possibly need as early as possible, because it might take people a while to get around to giving you access. We’ll return to these deployment environments in section 6.
Ask for all the logins you might possibly need as early as possible, because it might take people a while to get around to giving you access
In many contexts, you’re probably also going to use a tool called Docker.
Docker is a tool for creating isolated, repeatable computing environments, like little virtual machines running within your computer with a tightly controlled environment. These environments – containers– solve the common issue of environmental discrepancies – some people work on Mac 10.13, others on Mac OSX 10.9, various different Linux distributions or even (shock horror) Windows.
The best analogy I’ve been able to conceive of is musical. Docker starts with a Dockerfile, which is like a piece of sheet music specifying a song. When it’s compiled by Docker, it becomes a Docker Image, which is somewhat like an MP3 of that song. Whenever we want to launch a computing job from the docker image the result is a Docker container, which is a ephemeral (meaning short-lived), consistent (it’s always the same) computing environment that’s specified by the image – in the same way that playing your MP3 produces a short experience that’s exactly the same each time you do it.24

Docker (logo is a blue whale) is a tool for creating consistent runtimes. It starts with a written description of your computing environment, like sheet music. This is then compiled into an image, a bit like the music being recorded as a file. From this image we can launch containers, which are short-lived, identical computing jobs, a bit like each play of an MP3 produces exactly the same experience for the listener. Source: author
If your environment uses Docker then it’s worth wrapping your head around the fundamentals of creating and destroying Docker containers. Comfort with these concepts will reduce the friction of development and enable you to get your code to review faster. In particular, try and understand:
- The difference between an image and a container
- How images are stored
- What
docker composeis and why it’s useful
Let’s assume that your project is nicely organized in Docker compose and has a single entrypoint, in which case you’re going to run something like:
docker compose up -d
1. Where are tasks organized?
Teams need a way to keep track of what work needs doing, when it will be done, and who will do it.
Most modern software teams are described as “agile” which basically means that they work in 1-4 week cycles, after which they pause and figure out what to do next. This consists of choosing a bunch of tasks – often referred to as tickets or issues– to work on for the next cycle.
The most frequently used – but deeply unpopular, amongst developers – system is called Jira. There are lots of others, and many version control systems have their own issue trackers built in.
There are 3 main types of tickets to wrap your head around:
- Tasks: bits of work that need to be done, typically taking 1 – 12 hours
- Bugs: things that are broken
- Epics: meta-tickets representing a big chunk of work, comprising multiple tasks
The most important property of a ticket is its status, which is usually one of:
- To Do or Backlog: Stuff that needs doing
- Doing: Being worked on
- In Review: The work is done, others are reviewing it
- Done: It’s finished
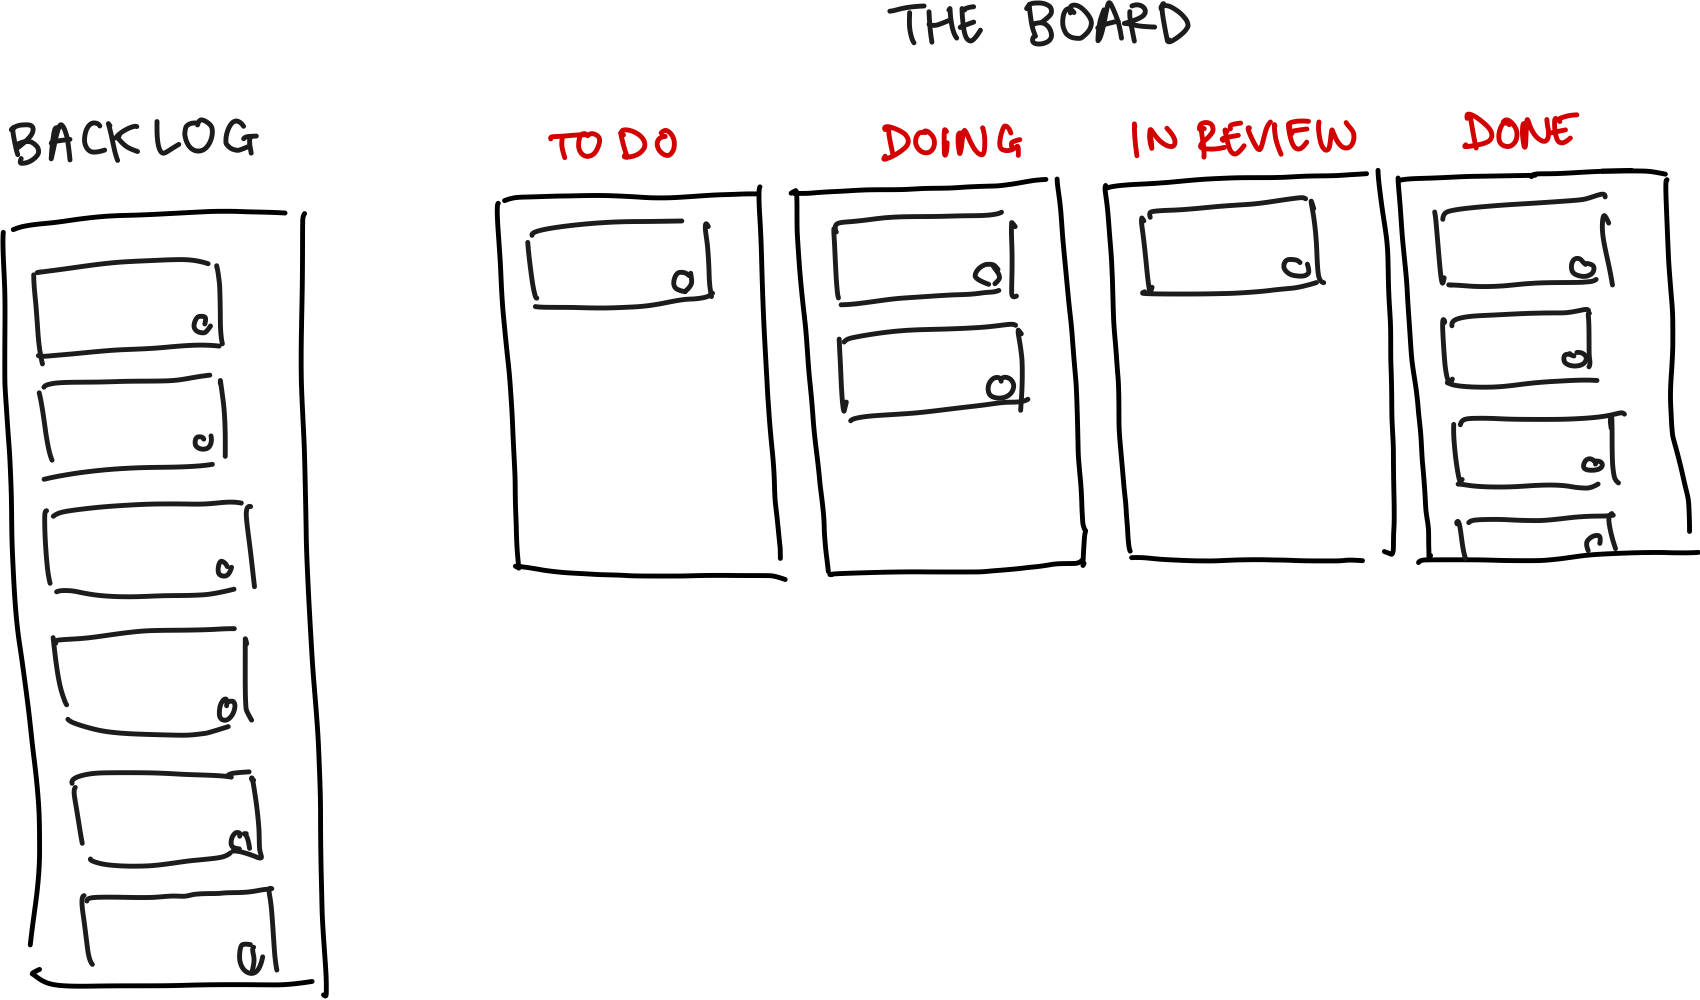
A typical setup: lots of tasks live in the backlog, which means they’re not going to get done soon. Tasks which are selected end up on “the board”, where they move through To Do, into Doing, then In Review, and finally Done. The ticket is then finished, or ‘closed’. Source: author
Standups, planning, and retros
Most software teams have 3 regular meetings in which progress is reviewed and decisions are made. In these meetings you’ll choose or be assigned your tasks, report your progress on them, and reflect on how they could have been accomplished more smoothly.
Planning
Frequency: once per sprint
Duration: 1hr +
Purpose: a big meeting where the team, or sometimes just its leadership team, decides what should be worked on next sprint. There’s lots of techniques people use to prioritize work and estimate how much can be done. More here from Atlassian.
Standups
Frequency: usually daily
Duration: 10 minutes
Purpose: Daily check in on who is doing what, what got done (or didn’t get done) yesterday, and any problems that people are stuck on.
Retros
Frequency: once per sprint
Duration: ~30 mins
Purpose: this is a chance for the team to reflect about what has gone well and what hasn’t. These can be really useful when the team is mature and trusts each other. A lot of the time, however, they’re rather awkward. Still worth doing, though. A couple of popular techniques are Start, Stop, Continue and the speedboat.
Selecting your first tasks
Companies like to talk about “shipping fast” and “iterating quickly”, and this is generally accepted to be a good practice in software engineering.
Shipping fast allows you to rapidly discover imperfections in your understanding of what needs to be built and the best way to build it. Particularly in startups, we have imperfect knowledge of our users and the business often develops in unexpected ways. The best way to deal with this uncertainty is to ship things fast.
These principles are even more critical for you as a new developer, because there is so much you don’t know. The best way to learn about the use case, the software development tradition, and how to write good code is to ship loads of it, get feedback on it, and improve.
Remember, your objective is to maximize the number of cycles you go through, and to do that, you need to pick small tasks.
Try and find the smallest possible contribution you can make, and then do that. It’s better if it’s a bug fix than a new feature, because developers don’t really enjoy bug fixes so you’ll be doing everybody a favour.
Small tasks which have relatively isolated solutions (meaning that you don’t have to code change in too many places) are excellent because:
- They help you build momentum and trust: it’s good for you and your team to feel like you’re making a contribution early
- They are easy for others to review: it can be very time consuming to review code, and you need to earn the right for people to spend hours trying to help you improve – keep it simple and the start and limit cognitive overhead for your colleagues
- You are less likely to do them incorrectly: there’s less room for error in small tasks, and it’s easier for your incorporate feedback on smaller pieces of work
So let’s assume you find yourself a nice, small task, to make a button bigger. It’s got a reference MP-910 , which we’ll use later to associate your work with the problem your code is solving.
Here’s what your JIRA ticket might look like:
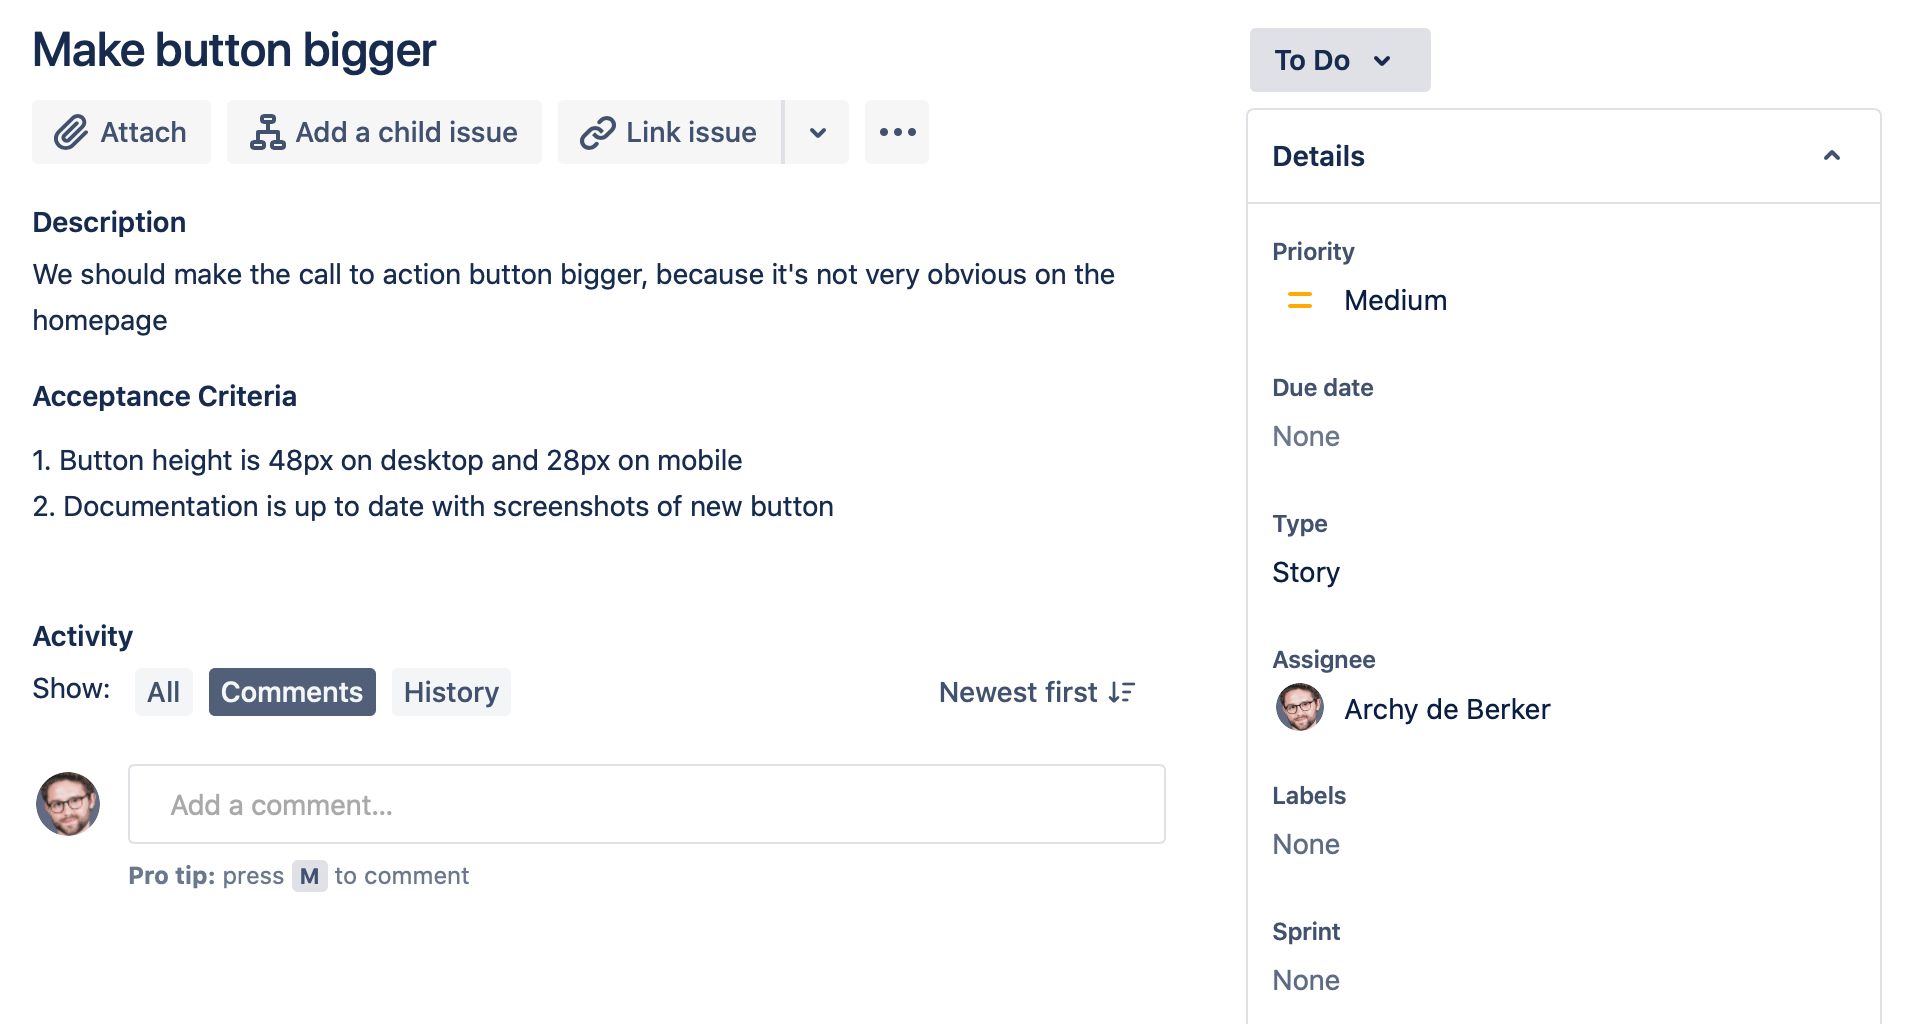
The Acceptance Criteria should be a clear description of when this ticket can be considered “done”. If you open a pull request which doesn’t satisfy these criteria, your colleagues will probably reject it. Source: author
You signal your intent to complete that ticket by setting yourself as the Assignee, and move it into “In Progress”, and we’re ready to roll.
2. Setting up to write code
Armed with a functioning local version of the application and a task of our own, it’s time to write some code.
Choosing an IDE
In order to work on MP-910 you’re going to need to write code, and to write code, you’re going to need a text editor.
More traditional developers use editors built into their terminal, such as vim or emacs. Watching somebody who’s proficient at this can be dazzling, as they hammer out obscure keyboard shortcuts and flick through files without their hands ever leaving the keyboard.
However, the learning curve is extremely steep, and I would highly advise avoiding trying to learn these tools in your first year of writing software.
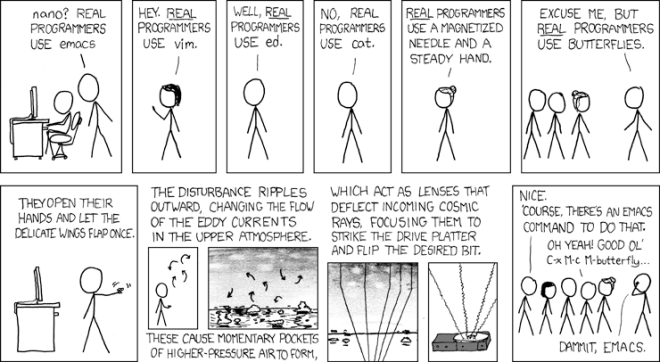
Less sophisticated text editors come with a certain cachet, but don’t get sucked into the idea that you have to use 1970s software to prove you’re hardcore. Source: XKCD
Instead, you should use an Integrated Development Environment, or IDE, which is a separate application on your computer specifically for writing code. They have lots of helpful features for navigating and manipulating code, and they’re often supported by a rich ecosystem of plugins written by the community which add useful functionality like file previews and code linting (more on this shortly). They usually have built in terminals and version control integrations, so you can write, run, and commit code within a single application.
If you’re writing Python, then I would recommend PyCharm, which has the best code navigation for Python. The Java equivalent is IDEA, which is also excellent.
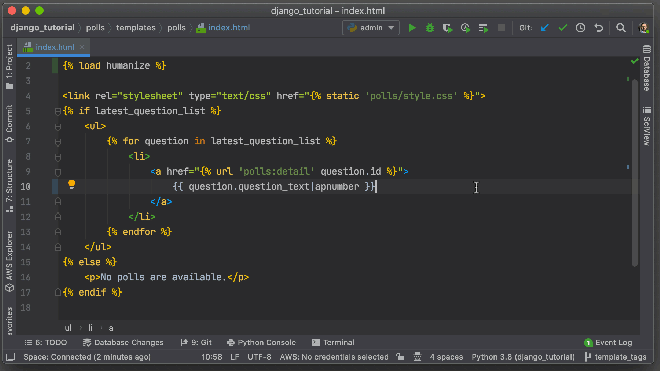
Pycharm is a great Python IDE. You can commit code and push to version control without leaving the editor. Source: JetBrains
For more or less anything else, I’d suggest Visual Studio Code, which is very extensible, fast, and growing in popularity. You can also use it in the browser, so it gives you a very portable toolbox.
Setting up an automatic linter
Linting is a funny word that has nothing to do with the pieces of fluff you find in your belly button.
It describes formatting your code in a consistent way, making it easier for others to read. It’s essentially a set of rules which should be followed to keep things standardized. These rules vary by language and organization, but they’re things like:
- class names should be capitalized:
class MyClassnotclass my_class - quotation marks should be double, not single
const name = "Archy"notconst name= 'Archy' - maximum line lengths, to keep code compact and legible
It’s very easy to irritate your colleagues by not following these kind of guidelines. Many companies will run a linter which checks whether your code conforms to their rules and prevent you submitting code which doesn’t.
To make everybody’s life easier, I suggest installing a code formatter which you can configure to autoformat your code inline with your company guidelines and make it pass linter inspection.
Here’s the pitch from Prettier, one of the most popular Javascript formatters, which expresses the virtues of a formatter nicely:
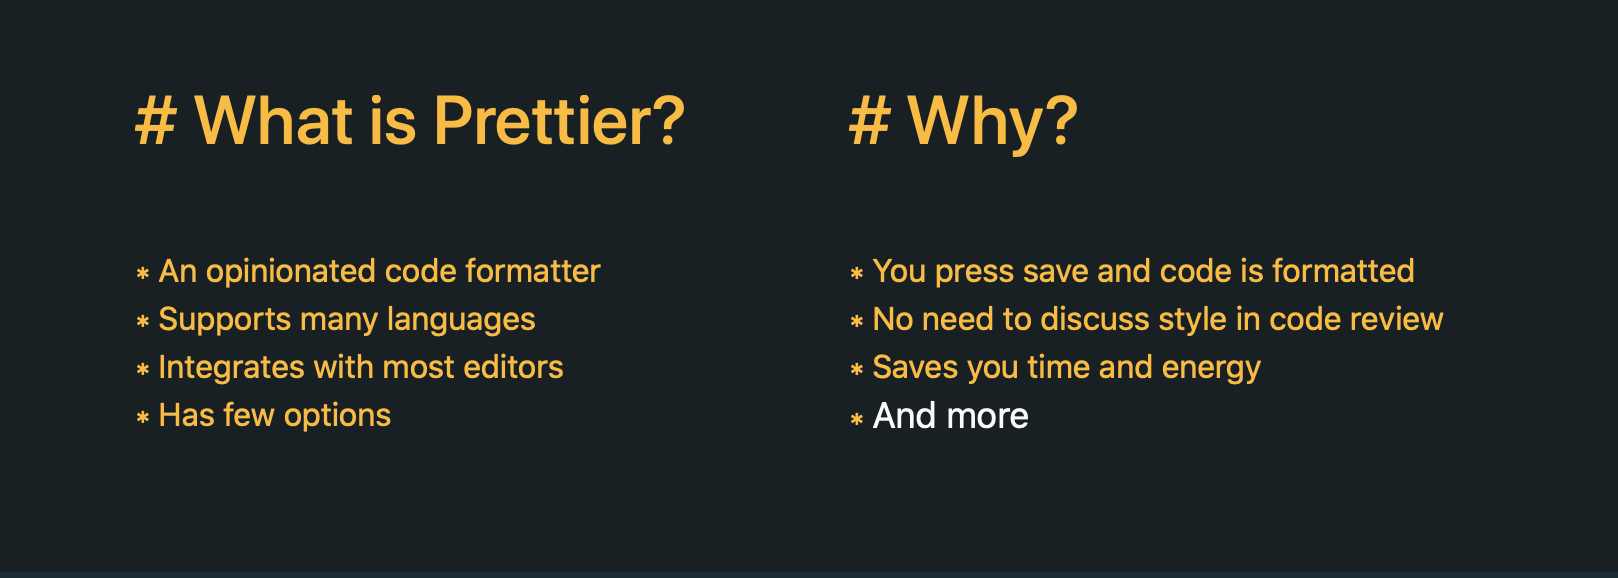
Source: Prettier
Prettier works very well and integrates with linters like ESLint and TSLint.
If you’re in Python, I suggest using Black. You can install this as a plugin for PyCharm and then add a keyboard shortcut to format your code for you. It’s magic.
Using your IDE to execute and debug code
Most IDEs include functionality for executing code that you’re writing.
It’s worth setting this up properly, because being able to get quick feedback on whether your code compiles or runs without errors is very helpful. This is another feedback loop that you should aim to make as fast as possible.
A second big advantage is that this gives you access to a visual debugger, allowing you to pause code execution and inspect the state of your code to identify problems. This is much much better than print or console.log.
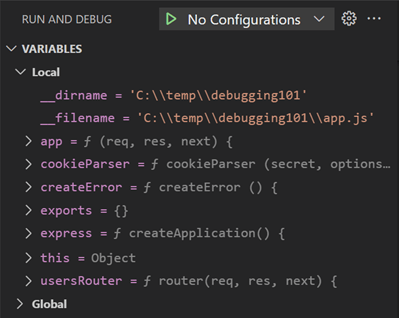
Debuggers allow you to pause execution and inspect the state of a program at a particular point. Source: Visual Studio
Testing your code
One of the biggest differences with school or academia is that companies don’t expect that your code is correct because it seems correct: they expect you to prove it with tests.
These tests are run every time somebody tries to contribute a change to the main body of the codebase, and before new code is deployed. They ensure that everything is working as expected. The basic format of a software test is something like:
def test_when_country_is_England_then_language_is_English():
    lang = get_language_for_country('England')
    assert lang == 'English'
This is a fantastically good idea, because:
- It’s easy to make mistakes when programming: automated testing guards against this
- Automated testing allows us to edit the codebase more freely, because we’ve got a set of alarms that will tell us if changing something in place A affected some functionality in place B we didn’t know about. This allows us to move faster – and get through that darned lifecycle more quickly.
- Tests provide “live” documentation of how the software works: well-designed tests trace out the major routes of information flow through the system. It’s often easier to figure out how something works from reading the tests than reading the documentation.
- Testing enforces certain good programming habits: it forces you to structure your code in small chunks and encourages you to separate different pieces of functionality wherever possible. If you write spaghetti code, you’ll find it very hard to test.
Moreover, as a newbie in the firm, you can greatly increase your colleague’s confidence in your first batch of changes by writing good tests. It’s often easier to verify the logic of the tests than that of the underlying implementation: a well-written set of tests says to your colleagues
I’ve thought carefully about the ways this thing could go wrong, and I’ve written tests to ensure that they don’t
As discussed below in Code Review, your colleagues are busy humans prone to the regular frailties of stress, exasperation, and intolerance. You can make their lives much easier by writing good tests. In turn, they’re more likely to provide high quality, interesting feedback like “you could refactor this piece to improve the time complexity” rather than boring feedback like “I can’t tell whether this will work or not, write some tests”, or “does this actually work?!”.
3. Pushing code to version control
Ok, you’re now in a position to make this button bigger! You can run the project locally and use the debugger to fix problems, whilst autoformatting your code to the company’s specification. Sweet.
Remember when we git cloned the repo to get a current version of the code? We also use git to record our changes to the codebase, and submit them to the rest of the team for review. We will do this by checking out a new branch from the main branch, adding some commits, then opening a pull request in which we ask colleagues for feedback before merging the work back into the main branch.

A basic workflow. We create a new branch for our feature, and add commits (black dots) before merging back into the main branch (white dots). Source: author
Ultimately, your work will form part of a series of atomic changes to the codebase which are layered on top of one another to form a (hopefully) great product with an informative history of how the code has changed over time. It’s worth making sure your part of the story is written in a way that does your proud.
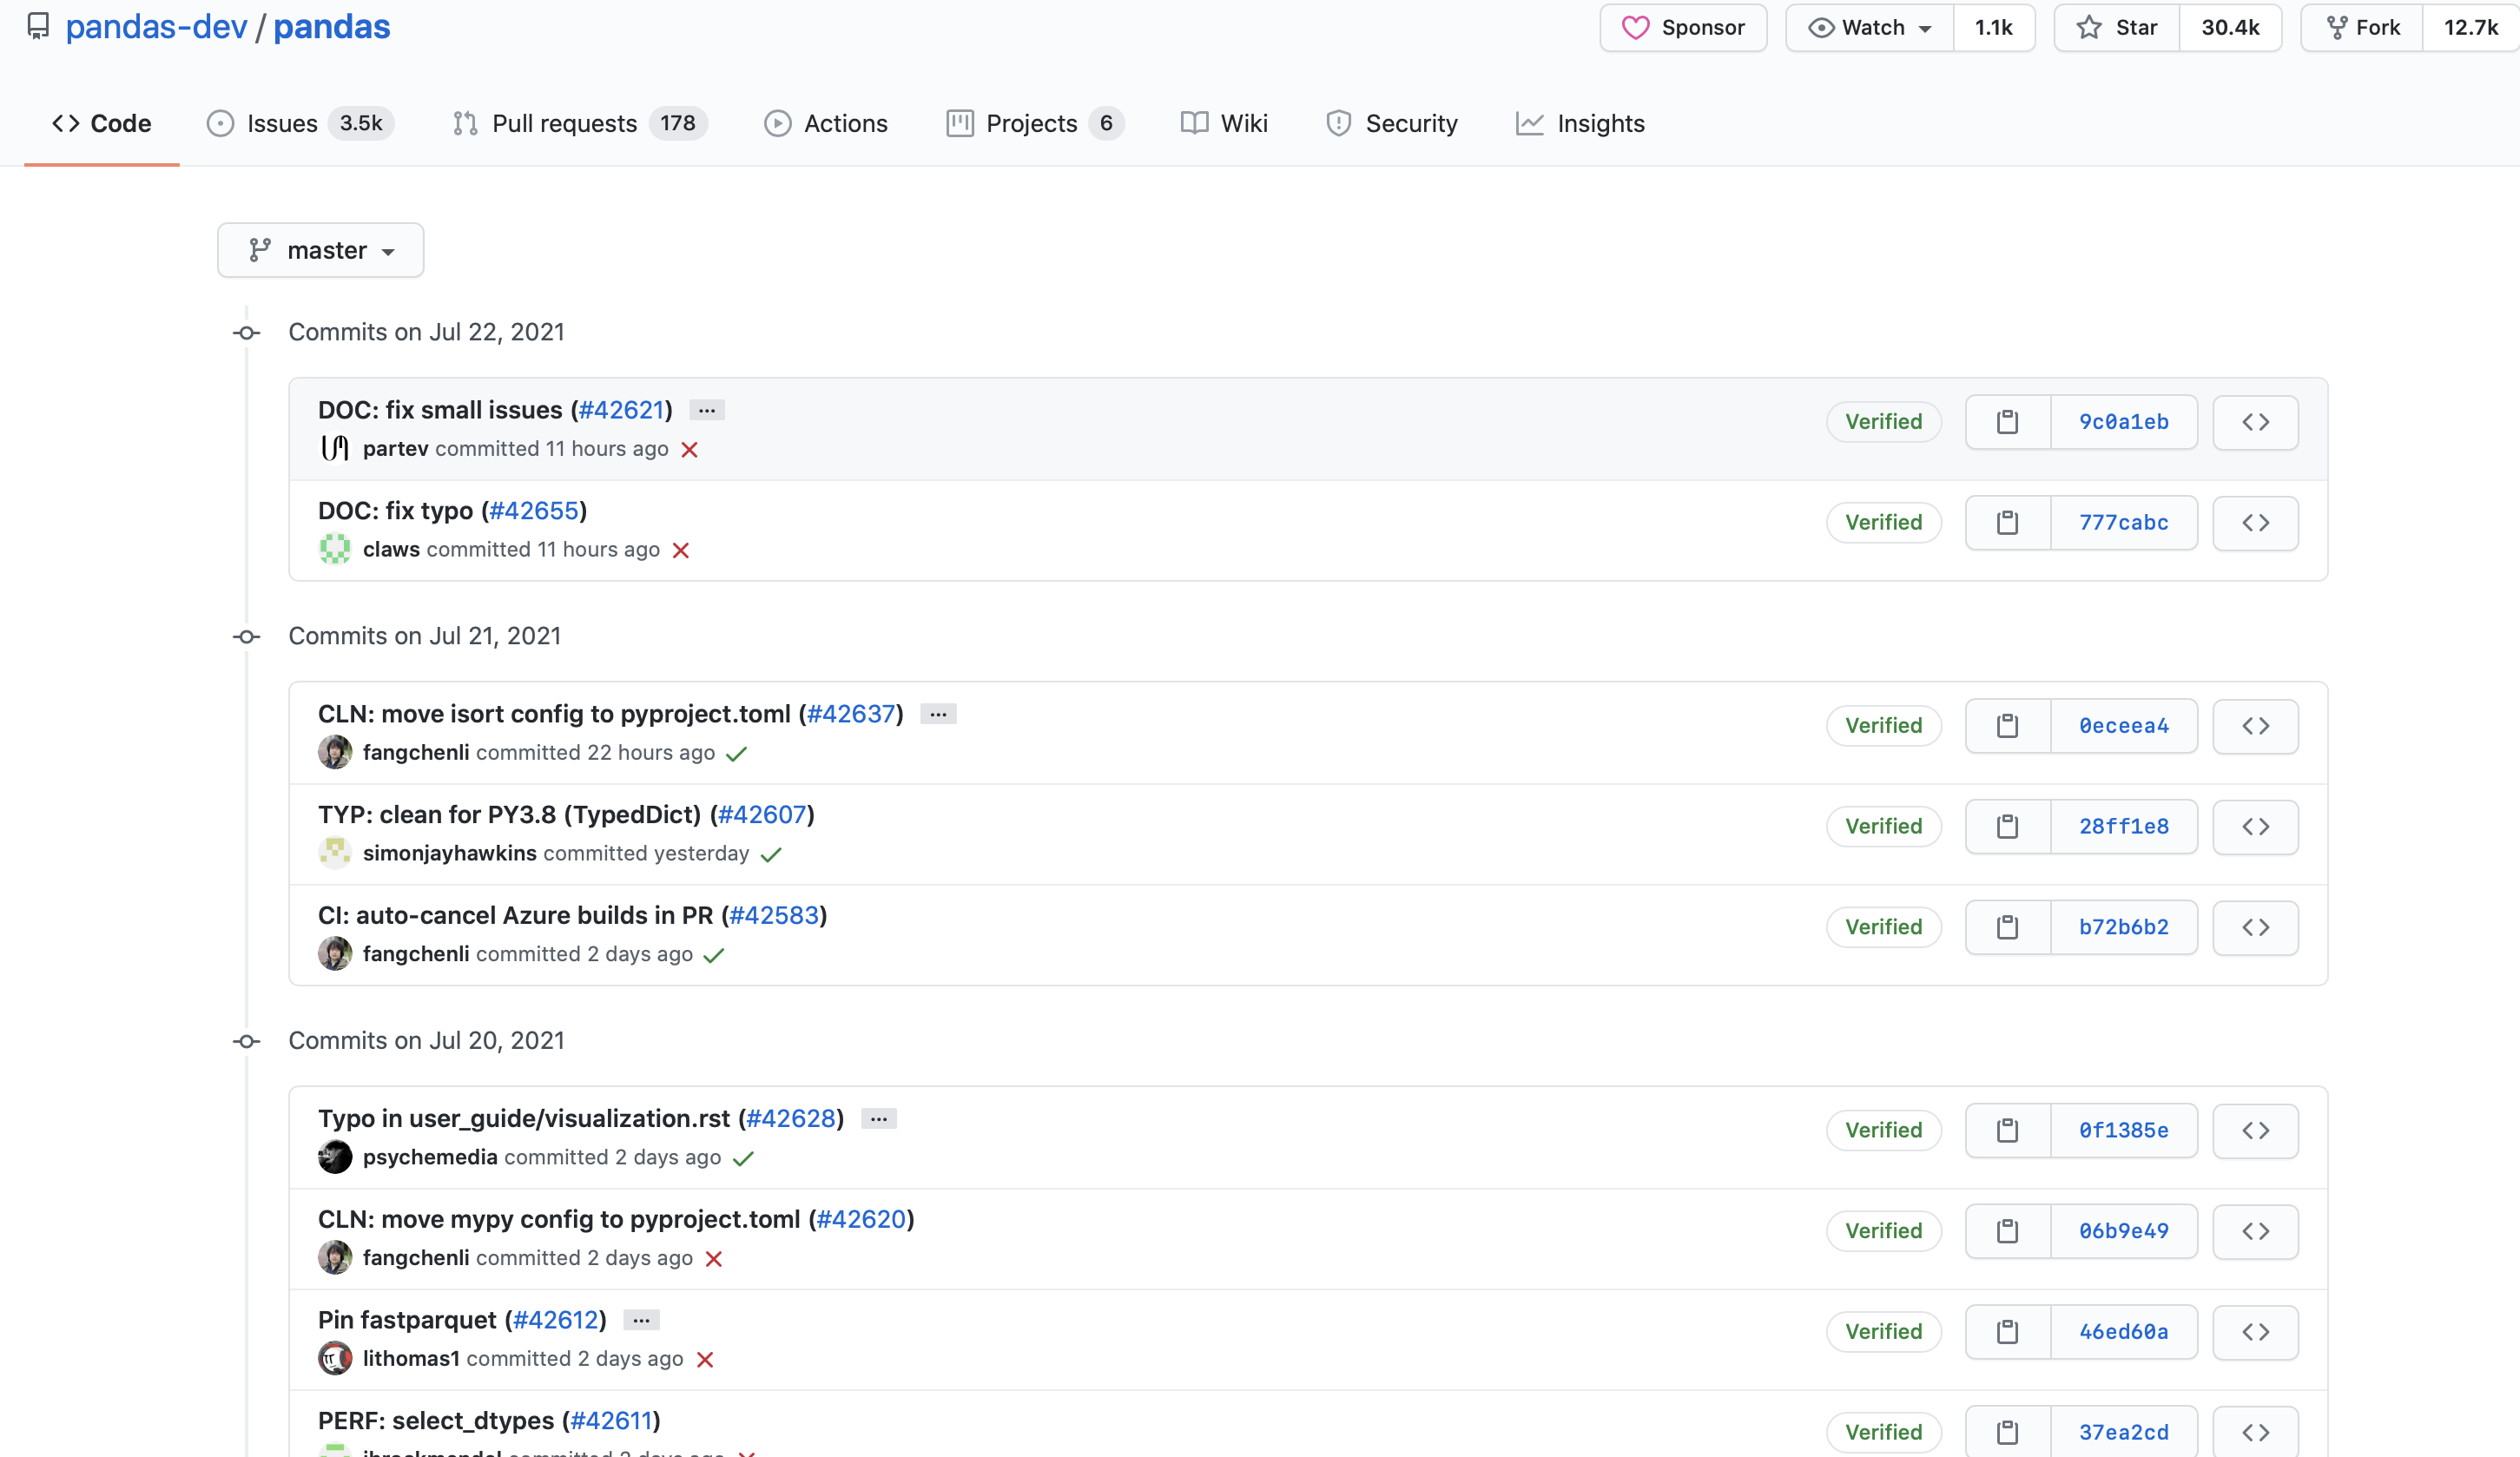
This is the git history for pandas, a popular Python data analysis library. Each row here is a commit to the master branch, along with a message about what changes that commit introduces. The current code in master is the result of applying all of those changes in turn. Source: Github
Basic git commands
You’re going to need some basic proficiency with git in order to contribute to a collaborative codebase. Git can be overwhelming, but there’s lots of good content already:
- Github: Git Handbook
- Loyola Marymount University: Intro to Git
- Free Code Camp: What is Git and How to Use It
The commands you need to understand well are:
branch– create copies of the code that will evolve independently of one anothercommit– a chunk of work in which you changed some thingsadd– add modifications or new files to a particular commitpull– grab changes to the code from the serverpush– copy your local changes onto the server
Although it can be daunting and unintuitive, the good news it that git is your insurance policy. It’s a safety net which makes it extremely unlikely that you will permanently break something. This means you’re free to mess around, try stuff, and break things for yourself without impacting the rest of the team.
Here’s the minimal two step workflow:
1. Organize your work in a branch
The branch is a core git concept which describes a copy of the code to which changes can be made independently of the rest. Most repositories have a few special branches which you can’t push code to directly, with names like master, main, production, or develop. Different organizations adopt different strategies for organizing work in version control.
In all cases, the intention is to segregate the stable body of the code from new, unstable functionality, which is then incorporated into the main codebase once it’s passed the necessary review and testing steps. This is the basic model outlined in Github Flow.
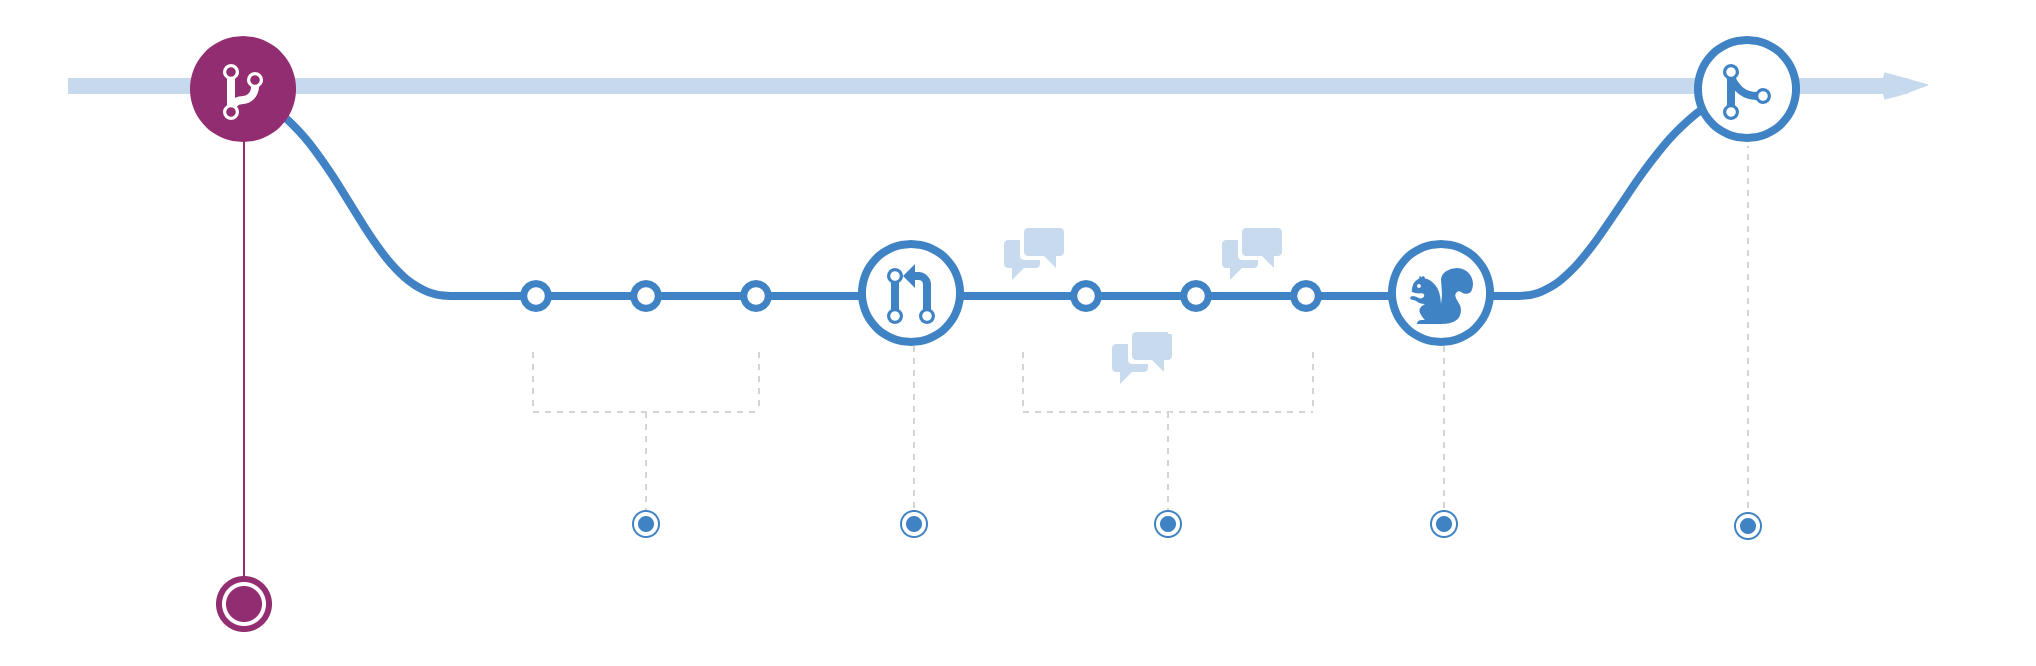
A simple branching model. The straight line at the top is the main branch. We branch off into a feature branch, add some commits (white circles), open a pull request (big circle with arrows), then after reviews (speech bubbles) it gets deployed (squirrel, for some reason), and merged into the main branch again. Source: Github Flow
In order to make your changes, you’re going to need your own branch. There are a variety of branch naming conventions: some companies use a prefix like feature or bugfix to denote the category of the branch. Figure out the convention, and checkout a branch from the main branch to get working on your first task:
git checkout -b feature/MP-910-make-button-bigger
That MP-910 is the reference to the task you’ve picked up. By including it in the branch name you’re giving your version control and your task management system a chance to communicate, and move tickets automatically when code is pushed (which hopefully somebody in your company has set up – if not, that’s a good small task for you 😉).
2. Split your work into commits
A commit is a set of changes to the existing code, associated with a message explaining the logic behind the change.
Ideally your commits represent intuitive steps in your process of accomplishing the task. It’s sometimes helpful to break up the work before you begin, and then use that as a guide to your commits.
What’s the point of organizing your work in commits?
Firstly, if your work introduces a bug, it’s easy to work backwards through a series of commits to figure out at what point the problem was introduced.
Secondly, if at some point you want to re-use some of your work but not the rest, you can take the commits that you want and put them somewhere else (this is called cherry-picking, and it’s a bit of an advanced topic).
Thirdly, and most importantly, the commits describe the logic of your code changes, breaking up your work into a series of bite-size chunks that are more intelligible to others (and your future self).
In our example we want to make a button bigger, which probably only requires adding code in one place. But we might actually need to make two changes, one to the button and another to a screenshot in the README which depicts the button in question. In this case, it would be good to break the work into two commits:
(43a1r1) Increase sign up button size to accomodate new text
(71282e) Update README screenshot to show new button
Those numbers in brackets are the hash of the commit – a unique identifier that Git uses to identify the commits and handle merging work together. The sentences are the commit messages which describe in simple terms the work done in that commit.
Writing good commit messages is an art form, but three pointers:
- Start with a Capital letter
- Write in the present tense: “Increase”, not “Increased”. This describes what will happen when somebody applies the changes associated with this commit to the code
- Try and communicate the intention of what you’re doing, not the mechanics. People can read the changes to the code themselves: the commit messages allow you to capture additional detail about why you’re making those changes
More on good commit messages from Chris Beams.
Ok, you’re now ready to push your commits!
4. How do people review my work?
Before your edits to the code are merged into the main branch of the project, your colleagues will want to review it.
Code review is a tremendously helpful exercise which helps maintain code quality and keeps everybody aware of how the code base is developing. Most importantly for you, it’s a great opportunity for you to learn from your colleagues.
Unlike in the majority of professional situations, during code review people are really incentivised to give you high quality feedback. This is because you’re writing and editing code that they’re probably going to work on in the future, so it’s in their interest to make sure it’s good.
Continuous integration
The first reviewer you have to satisfy is usually automated: a so-called Continuous Integration system such as Jenkins, CircleCI, or Github Actions. The name is a nod to the idea that automated testing gives us higher confidence that our changes won’t break anything, allowing us to move towards continuous (as opposed to sporadic) deployments.
These check that the code can be built and tested successfully. Typically, the version control system is configured such that you can’t merge code that fails these checks.
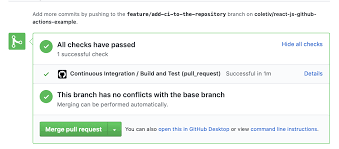
A PR which has been built and tested successfully, Source: Coletiv
Some systems will also create a test deployment for you. This is a really nice feature, allowing your reviewers to actually play with your code without requiring them to set it up locally.
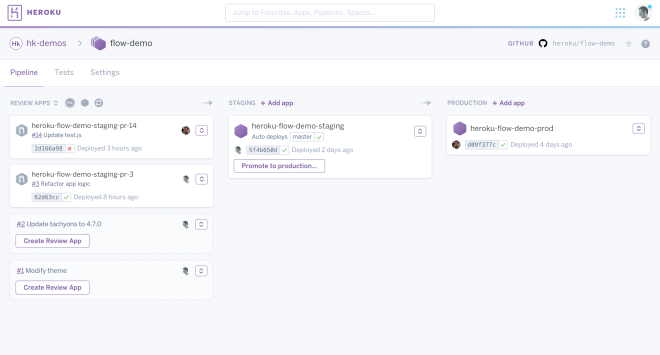
Review apps on Heroku. The boxes on the left correspond to ephemeral deployments created when a Pull Request was opened. Source: Heroku.
Submitting your code for review
It can be pretty nerve wracking to go through your first code review. Try not to take any feedback personally, and don’t be surprised if people find errors that you had missed – another pair of eyes is often very useful.
Here are a few pointers to keep your first code review buoyant rather than bruising:
Document your PR properly
Start with a succinct description of why you’re making this change, and any additional background the reviewer of the code needs to understand what’s going on.
If there’s stuff you thought about but didn’t do, this can be a good place to include it, so reviewers don’t waste time writing “have you thought about…”.
If you’re making a change to the way something looks, include a screenshot or even a video of how the thing has changed! We’re trying to make life easy for the reviewers. Don’t make them checkout your branch to see the effect that changing a margin by 10px has on a button!
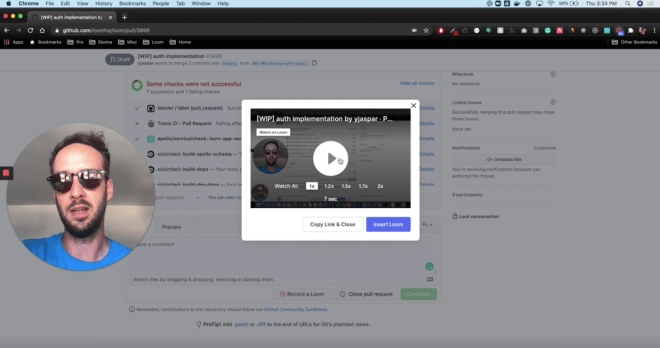
Add as much context as possible to your PR: maybe even a video. Loom is a useful tool for this. Source: Loom
Run the freaking linter
As mentioned above, it’s really helpful to automatically format your code before submitting it to review.
This will catch lots of stupid errors – like commented code, unused imports, or weirdly-named variables – that will otherwise simply frustrate your reviewer.
Check that everything runs locally
This sounds stupid, but you’d be surprised how often we don’t properly check that the code runs locally.
Particularly if you’re working with a multicomponent system – frontend, backend, and database – please do just check that everything still plays nicely together as you expect.
Check that tests pass
Another surprisingly common error is to fail to run the tests locally.25
You then push your code, go and do something else, and realize 30 minutes later that the tests have failed when the continuous integration system has attempted to run them. By this point you’re working on something else, and reviewing your code has slid to the bottom of your reviewer’s to do list.
Review your own PR
Your version control system will display your Pull Request with helpful highlights showing what you changed.
It’s a really good idea to have a look at these yourself! I often find that I’ve changed a file I didn’t mean to, or added a file to the Pull Request which was irrelevant.
Sometimes looking at your code from the reviewer’s perspective helps you spot changes that clarify or clean up the code. Putting yourself in your reviewer’s shoes can help you assess your own work more objectively.
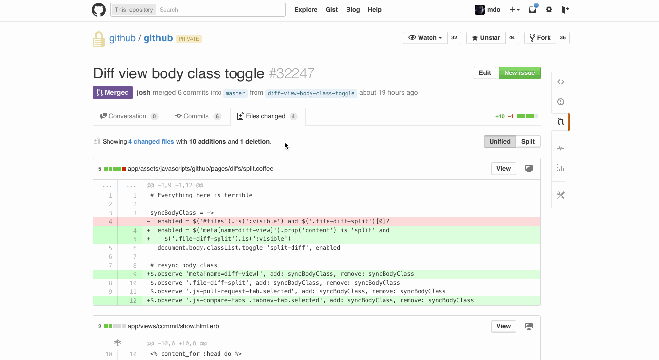
Git diffs: red for deletions, green for additions. You can view these in a unified or split style on Github. Source: StackOverflow
Reviewing others’ code
When it comes to reviewing other people’s code, try to remember how scary it was to submit your own code to review, and how even the gentlest suggestion felt like a fundamental challenge to your worth as a human being.
Some pointers on humane code review:
- Avoid “you”. Try “we’re missing a comma” rather than “you’re missing a comma”
- Phrase as suggestions, not instructions. Try “maybe this would be better” rather than “you should change this”
- Be constructive. If you’re suggesting a change, consider offering a piece of working code that does what you’re suggesting “If we use a dictionary instead like
a = dict(A=1)that will be more efficient” - Is it wrong or different? Sometimes people will complete a task in a way you didn’t expect. The knee jerk reaction is to tell them this. Before you do so, consider whether their approach is actually worse, or just different from what you had in mind.
- Use emojis to soften the tone of your critical comments 🤨 🙋💡
- Not everything has to be negative in a code review! If you think something is cool, or you learned something, say so. 26
- You can ask questions! The review doesn’t have to unidirectional – the person who wrote the code is probably more than happy to explain in depth the neat way they found to reduce time complexity from O(n) to O(1) – take advantage of this.
For more tips, checkout Google’s Engineering Best Practices on Code Review 27.
Finally, remember that it’s much easier to fix a broken function than it is to fix a broken relationship. Particularly if you’re an engineer.
5. Deployment
Deployment is where the rubber hits the road: your code becomes part of the product that is exposed to users.
This is often a two stage process. Most companies have one or more staging environments, which allow you to check how your changes behave when they’re let loose in a sandbox before sending them out into the wide world. Once you’ve tested functionality in staging, it’s deployed into production.

A typical deployment flow. Often staging will be referred to as “dev”, or “development environment”. In some flows, staging is associated with one git branch (often develop) whilst production is associated with another (main or master). Source: author
Continuous deployment
The sibling of the continuous integration discussed above is continuous deployment. This is the automation of deployment of your code: when you merge a PR into a given branch, the code is deployed to a specified environment.
This is typically handled by the same service as your CI, either your version control system (e.g. Github), a third party service (e.g. CircleCI), or your hosting environment (e.g. AWS).
Hosting environments
When people talk about software being deployed “on the cloud”, they really mean that it’s deployed in a big data centre owned by a company that doesn’t pay much tax.
Amazon Web Services (AWS) and Google Cloud Platform (GCP) are the most popular, with Microsoft Azure and Heroku favoured by old school companies and hobbyists respectively 28.
The alternative is local or on premise deployment, where code is running in a specific, named data centre – this is rare, and typically only used in very sensitive contexts (e.g. healthcare) or when there are unusual hardware requirements (e.g. deep learning).
If you’re lucky, you won’t have to tangle very much with the hosting environment in your first role. Configuring and maintaining deployment environments is an art unto itself, giving rise to the discipline of DevOps, which is 50% people slick consultants in blazers talking about boosting velocities and 50% dudes 29 in Metallica t-shirts who have a supernatural ability to figure out why your build is failing.
Broadly speaking, your hosting environment is going to have to help you:
- Deploy stuff: take the code that runs on your computer and get it running in a data centre somewhere, usually either on a Linux instance or as a Docker container.
- Make it accessible to other people: expose it to the web and allow you to route users to it. When you have lots of different services, you’ll use tools to organize their interfaces with the internet neatly, like Virtual Private Clouds and API Gateways.
- But not all the people: your hosting environment will often help you with authenticating your users and managing what permissions they have.
- …And occasionally lots more than you expect: a big advantage of cloud computing is that it’s easy to scale your services to deal with more demand. This can be handled automatically if your credit card limit is high enough – this is known as autoscaling.
Wrapping up the cycle
Bonza. Your code is now deployed. If the task management automation hasn’t done it for you already, you get to move your ticket from In Review -> Done!
Hopefully the product is now a tiny bit better, and you’re a tiny bit wiser.

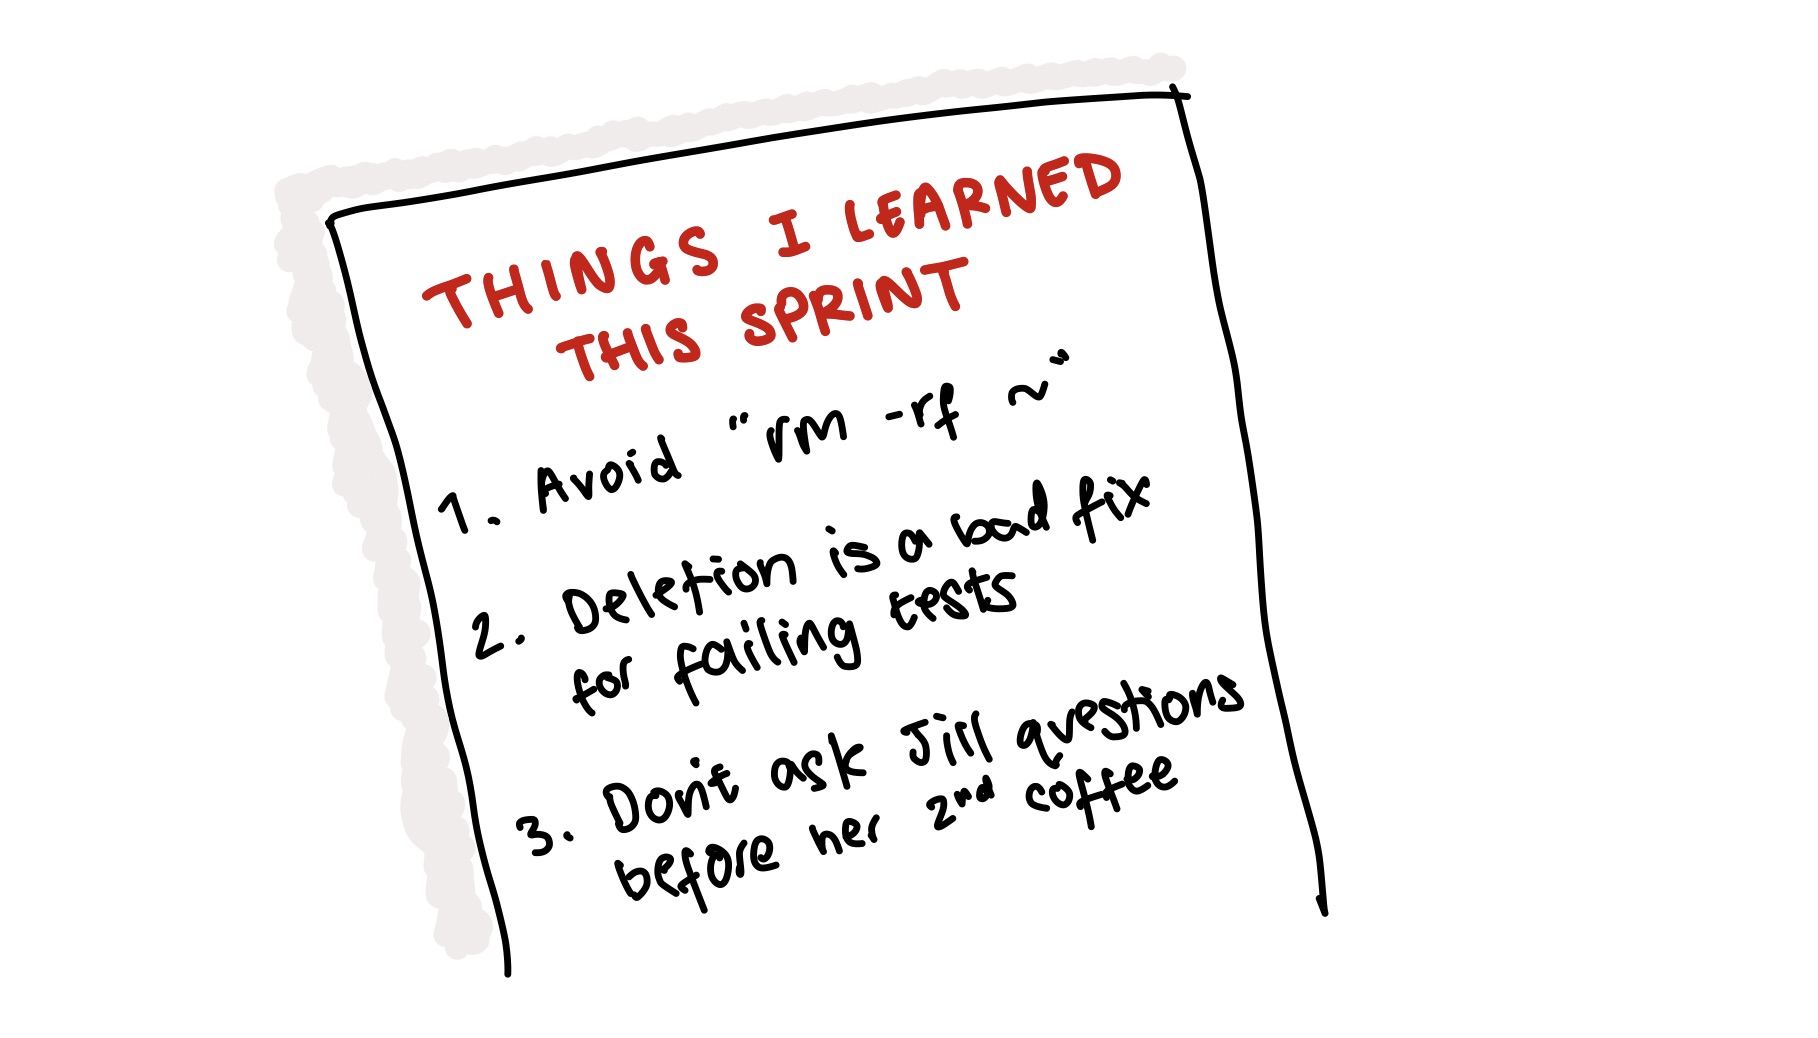
It can be helpful to note down things you learned each sprint. The first of these lessons is a genuine one; a few weeks into a new job I managed to accidentally create a local folder called ~ and then wipe my entire home directory in the course of attempting to delete the directory. Source: author
Consider noting down anything you learned whilst completing this piece of work. A logbook can come in handy when you hit problems you’ve seen before, and it provides a great stock of examples for those pesky behavioural questions in interviews.
Finally, if you get a chance, try to demo your work. This could be just to your dev colleagues, to the rest of the company, or even (ideally) to a customer. Not only might this result in some useful feedback, but it’s fulfilling to solve somebody’s problem and then show them the solution.
Hopefully the buzz you get from demoing your work will have you reaching for the next ticket in no time.
Further reading
Hopefully this guide has given you enough of a mental model to get started with writing code and accumulating feedback from your peers.
If you’re looking to read more about succeeding in your first tech role, the next topic I’d suggest digging into is how tech companies, and the teams within them, work.
Here are some pieces I liked:
- The Pragmatic Programmer: a classic. Useful programming tips, but the notes on how to understand your role in the company and interact with your colleagues and users are even more valuable
- Don’t Call Yourself a Programmer: a fantastic essay on how to conceive of yourself as somebody who solves business problems, rather than a code monkey
- Rework: it turns out that Basecamp might not be quite as idyllic as its founders make out in this book, but I still think these principles for sane, calm, productive teamwork are bang on
- Rands In Repose: a great tech blog with plenty of war stories and advice on having an enjoyable life in tech
And if you’re interested in other stuff I’ve written, here are a few more pieces:
- Avoiding rookie errors in machine learning
- Organizing applied research
- Avoiding pitfalls when transitioning from academia to industry
- Things I didn’t understand about starting a company until I tried
Footnotes
- Facebook, Apple, Amazon, Netflix, Google: the big boys
- This idea is closely related to Agile practices, but was really pioneered in the military, by fighter pilots like John Boyd
- Deploying is also known as “shipping” software
- Review does typically take longer for more complex work, so this is only sort-of true
- I’m in this category
- Frankly I find it all a bit confusing; thanks to Josh for his pointers on this section
- This is probably not best practice and against convention at many companies, but if given a choice, opt for speed
- If this analogy doesn’t make sense to you, here’s an alternative one from Vincent Warmerdam: the Dockerfile is like the blueprint for a machine in a factory, the Docker images are the machines, and the containers are the thousands of identical widgets made by the machines
- This is so common that many repos will have a pre-commit hook that checks that unit tests and linting passes before allowing you to commit your code. It’s a bit painful, but it works.
- You might see the acronym TIL – Today I Learned – used in this context
- Thanks Jonny Linton for this reference
- I really, really like Heroku, and I wish AWS was 1/10th as usable
- Yes, I’m sorry, it is mostly dudes